This is the whole process of building an EPS core board that I have designed in AKU so that I know the volume of the board and that what I end up with is accurate and true. I design the board and then design a blank file to suit each design and board. From this I get the VH grade EPS blank hot wired out of block foam. This the outline of the board minus the thickness of the intended wooden rail laminates. Depending on the board that is between 10mm - 20mm of rail. The blank is made thicker to give the machine operator plenty to work with.
The hot wired blanks is ready to have the first rail band templated ready to cut out and glue onto the blank.
The 3mm Paulownia strips are glued on with polyurethane foaming glue and high quality masking tape.
All ready to go off the be profiled on the AKU machine.
The AKU machine operator is given the blank with the first rail band on. The file I give him to cut with has the combined thickness of the top and bottom skins deducted from the design. And due to the cutting file being wider than the blank the machine cuts the rail band and foils it to the foil of the board design all at once. So when I get it back there is very little to do to it . After profiling , I set up a level bench and screw down blocks to fit the natural rocker of the board design to cradle it on the table. The middle or there abouts of the board is flat on the table top.
A centre line on the blank and the table help line everything up and keep it true and square.
The glue looks like honey as you squeeze it out
As you move it around it sucks up moisture from the atmosphere and starts to go creamy. And as you can see it only takes a little glue to do the job.
The 4mm deck and 3mm bottom skins are marked out and cut about 5mm oversize. Glue is spread onto the EPS blank with a squeegee and a mist of water is sprayed onto the skins prior to positioning them on the blank with masking tape.
The blank with the skin attached top and bottom are loaded into the .7mm PVC bag and located on the blocks I set up earlier to hold the rocker.Once everything is lined up , I tape the bag closed with masking tape and start the pump.
As the air is sucked out of the bag I push down on the centre of the board to hold it against the table and the blocks under the board. This holds the rocker and with all the contact surface area , nothing is going anywhere.The shade cloth allows the the air to be taken out without the bag sucking onto itself.
After 2 hours in the bag under pressure the glue has gone off. Now it is a matter of cleaning up the edges and excess top and bottom skins that over hang the rail bands. Now the EPS core is encapsulated in wood and sealed.
Glue a couple of 5mm rail bands down each side and mark out the double diamond but crack.
Get the Japanese saw in there and cut out the shape.
Clean it up if you have to with a rub of sandpaper and glue the laminates on
Then laminate the last of 3 x 5mm strips down the rails each side.
You will be amazed at the holding power of good quality masking tape. It just conforms to all shapes and angles like no clamp can. Or not that I have ever found.
All looks a bit rough and ready in the raw state with glue dags and all.
Nose laminates are all added as well.
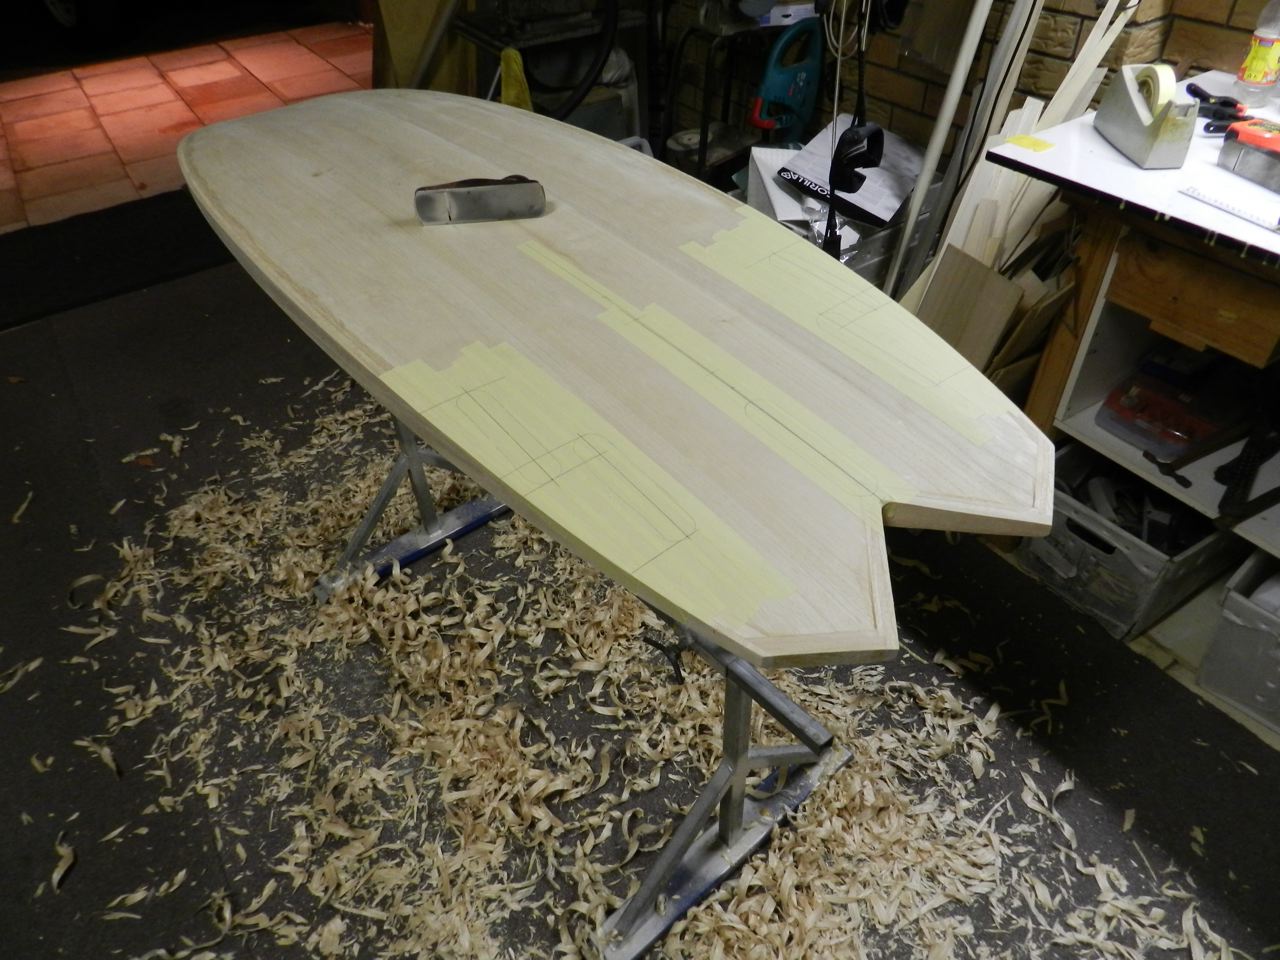
Get the freshly sharpened hand plane out, load up the board with a weight and get into cleaning this lot up.
Get all those glue dags and excess wood honed down to the foil of the board
It helps to have a nice good quality hand plane and know how to sharpen it. Add some wax to the sole of the plane and she will cut through this Paulownia like butter and slide over the surface like a beauty.
Now you get to see that outcome.
You can end up with a few shavings in no time at all.
Mark out the centre line and fin placement. I get someone else who has a jig to route out the install the fin boxes for me.
When you get your fin boxes routed in , it is best to put a clear coat of resinaround the edges to seal the raw wood before setting the boxes with the black tinted epoxy.As the black epoxy will bleed down the grain of the timber and not look the best. Something you learn the hard way.Same with the leash plug as well. It is interesting to note that with experimenting with this process even with the VH ( very hard ) grade EPS the epoxy will bleed through the beads and connect with the deck skin giving a good bond for the boxes. If you use lighter grades of EPS you might want to consider a heavier grade of foam as an insert to put the boxes in.
Well "Mo" has put the fin boxes in and I have hired his shaping bay to start shaping the rails. The 15kg weight is great for holding things in place while I get a start on things.
I have found good quality and sharp tools is the answer to getting the job done without a lot of stress.
The lights help big time with getting an even flow to your efforts. They cast shadows and allow you to see your progress as you blend. You need to plan ahead take it easy as you really get one shot at it.
Steady as you go.
I find that 80 grit emery cloth which is a fabric backed metal workers sand paper is strong flexible and tough enough not to tear and break down. You can get a good grip on it and pull it across the planer lines to smooth and blend your rails very easily. Very handy and very simple.
You can then go back to a lot lighter sand paper and go through the grades up to 240grit to smooth it right up to a great finish.
Round things off up at the nose and blend all the curves looking at them from all sorts of angles. The lights help here as well.
Just the but crack to deal with. I use a fine Japanese saw to cut a line and curve that I intend to work to in the middle and then use a rasp and sand paper to clean it up and blend all together.
I have a small orbital sander to fine sand the surface lightly as the sheets came well sanded and true.
Lots of hand sanding to fine tune the finish. If you have any knots or small gaps you can fill them with a putty made from fine Paulownia dust from your sander and polyurethane glue. Sand it off and it will just about disappear.
I use a rubber stamp and a good quality solvent ink to brand my boards which seems to work fine. You can get a branding iron logo made for some serious bucks. But it would depend on your logo as to the suitability for this. Fine type would just burn out literally.
Looking good and nice and smooth finish all round.
These are the tools I use to build a board.
A small orbital sander with a range of sandpaper
A small sanding block.
80 and 120 grit Emery cloth for sanding the rails is a great help.
You will need a good mask as this fine dust will get into everything.
I have a small hand plan and a really small hand plane , both really sharp.
Get yourself a Veritas honing guide and water stones for sharpening your tools.
I have a spoke shave for tight curves , concaves.
A Japanese pull saw, very handy.
I use
Fix it Mate polyurethane glue which I fine great for what I do. A bottle goes a long way.
You will need some cheap plastic spreaders. These ones are great the glue won't stick to it.
A small spray bottle is handy to mist water onto you timber before clamping as the glue is moisture activated.
Good quality masking tape is important as it has the right amount of stickiness and strength in the paper backing. Experiment, you will be amazed at the hold you can get with it and all the angles to do the job right. Lesser quality will let go or snap when the glue foams and expands , just when you have left the workshop. You don't need the surprises for the cost of a few dollars.
The odd spring clamp is handy.
I also have a small band saw which is very useful. I get all my Paulownia supplied dressed , thicknessed and glued up in sheets as I need. It all means you don't need to invest in expensive machines that will get little use.
I also have the vacuum pump and a PVC bag for it. You could share the cost with a mate.
The Lanolin I use is the General Purpose lanolin from
Lanotec. Lanolin in the natural wareproof grease extracted from sheep's wool. It is all natural and about as environmental as you could get if that is what you are after. It will waterproof and nourish timber, stop it from drying out. The added advantage is when it hits salt water it becomes stickier than any wax you have used. Yet when it dries out it is touch dry again. It last a fair old while between coats.
Just brush it on and let it soak in. You will know when it is saturated as it will not dry out and leaves a film on the surface.
Turn it over and do the other side.
Just sit it out in the sun and let it soak in before laying up another coat.
The happy customer.