Friday, June 21, 2013
Sunday, June 16, 2013
9ft 6" pintal
This is the progressive steps in building this 9ft 6" x 23" pintail
The custom hot wired EPS foam blank with the 5mm Paulownia stringer glued in.
The blank is then cut on an AKU machine that foils the board out top and bottom , minus the thickness of the Paulownia to be laminated to the top and bottom.
A 3mm Paulownia strip has been laminated to the rail edge of the blank.The blank is rested on a leveled table and shaped blocks located to hold the designed rocker during the vacuum bagging process. The board goes in the bag and it all rests on the blocks. Using the natural rocker in the board blank now all that is needed is gentle pressure to be applied to the middle of the board as the air is removed from the bag.
A 6mm thick Paulownia panel cut 5mm oversize for the deck and a 4mm one for the bottom are taped in place before sliding into the bag.All the air sucked out by the pump and this clamps the timber down all over with equal pressure to all surfaces. This enables you to replicate all your designed concaves and contours.
The Polyurethane glue needs 2 hours to go off in the bag. The bag is made from .75mm PVC , the same material you see in board windows and covers. It is tough , no stretch and the glue won't stick to it.So you can use it multiple times.
Out of the bag and ready to be trimmed up
This board will get 20mm of rails laminated on in 4 x 5mm thick full length strips.
All the rocker is retained and the foam is now encapsulated in wood.
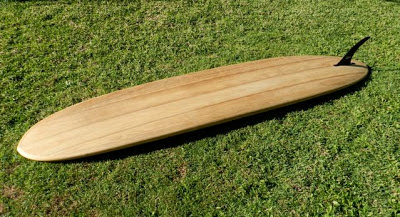
Here it is finished. The only resin on the board is to secure the finbox into the board.
It is finished with multiple coats of lanolin to nurish the timber and add to waterproofing.
The lanolin has the added advantage , that when it hits salt water that it becomes very stick and you will not need to use wax.
Old school leg rope hole through the fin box and out through the deck , simple neat and tidy. You and see the 4 x 5mm Paulownia laminated strips at the tail in a basket weave pattern.
Simple clear wood finish
5mm of concave in the nose with a very rolled bottom in the tail , no problem.
Tuesday, June 11, 2013
Saturday, June 8, 2013
5ft 6 x 22 1/2" x 2" Hydro Simmons
10mm concave full length of the board , starting out between the rolled shoulders in the nose. This is to split the width of the nose when doing a full rail turn. The rolled shoulders still give lift and it is like two hulls really. Something I have been playing with.
This flows through to a fill width 10mm concave in the middle of the board to capture all the flow and give lift with a hard rail edge.
The flow is then funneled in between the fin set out through the tail.
The fins also sit on a chine that releases the flow from the fins and narrows the tail width.
A 5 fin setup to experiment with
Ready to be glassed
It is thin @ 2" thick but 34. 5lt volume. Thin rails for higher performance.
Subscribe to:
Comments (Atom)


